Can I make kimchi without seafood or fish sauce and it still be as delicious?
Yes! Yes! Yes, you can!
This is the stuff dreams are made of, a mix of hot n’ spicy, tangy, sweet and sour. The layers of flavour play on the tongue like nothing else I’ve ever tried.
And you know what? You don’t have to be authentic with kimchi to get the whosh of flavour from your homemade stuff.
It’s not like you have to study Korean cooking (thought maybe you want to) to get the incredible results from making this stuff.
Quite the opposite – you can learn to make it at home with easy-to-source ingredients that you probably already have in your cupboard.
Bottom line: you can make kimchi without seafood or fish sauce, using easy-to-source ingredients and still get incredible tasting kimchi.
Table of Contents
What is Kimchi?
Kimchi’s a Korean dish of spicy fermented vegetables, usually mainly cabbage. It’s absolutely delicious and oh-so-easy to prepare.
You can make it more complex of course, but as usual, I opt to use a little artistic licence to simplify the whole thing.
How to Eat Kimchi?
Kimchi can be eaten on its own or as a side. It can also be added to rice dishes, stews, sauces etc. There are literally hundreds of types of kimchi and hundreds of ways to eat it.
Simpler than describing each way to possibly enjoy this stuff, is to say, what can’t you eat it with? And I guess that’s just a personal choice! Like maybe not on your chocolate muffins (but who knows?)
Here are some meals which are definite kimchi candidates. Serve it on the side or stir it through the dish, whichever you fancy more.
I love kimchi so much I can happily munch away on it just as it is. It does depend on the actual kimchi you have and how tasty it is.
I have tried some shop kimchis which weren’t so tasty as the homemade stuff and don’t wow me in the same way.
Just keep experimenting.
You can have kimchi that’s cut small or you can leave full leaves and use them for creative dishes by stuffing them with rice for example.
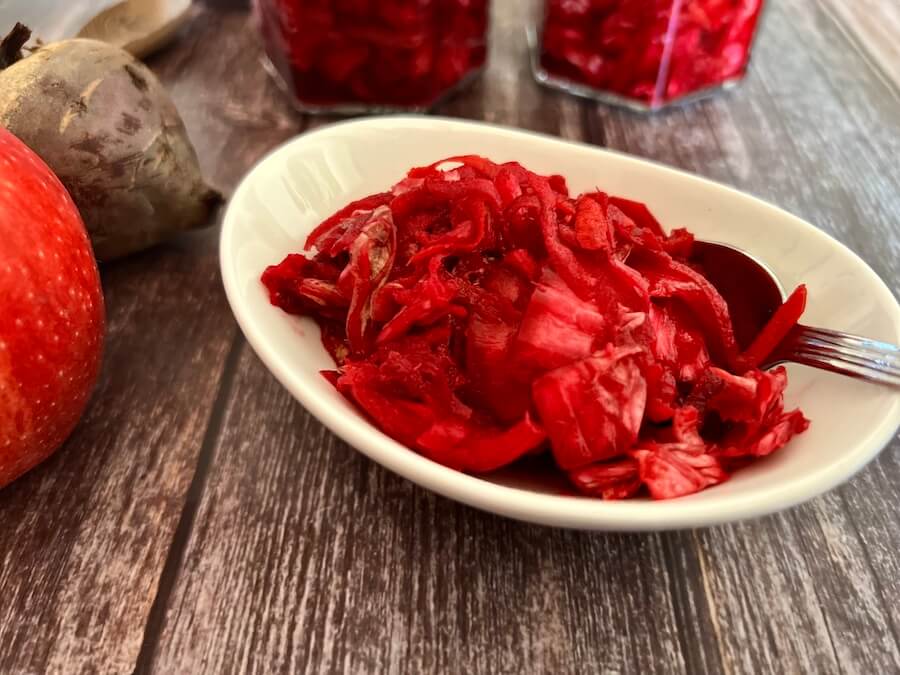
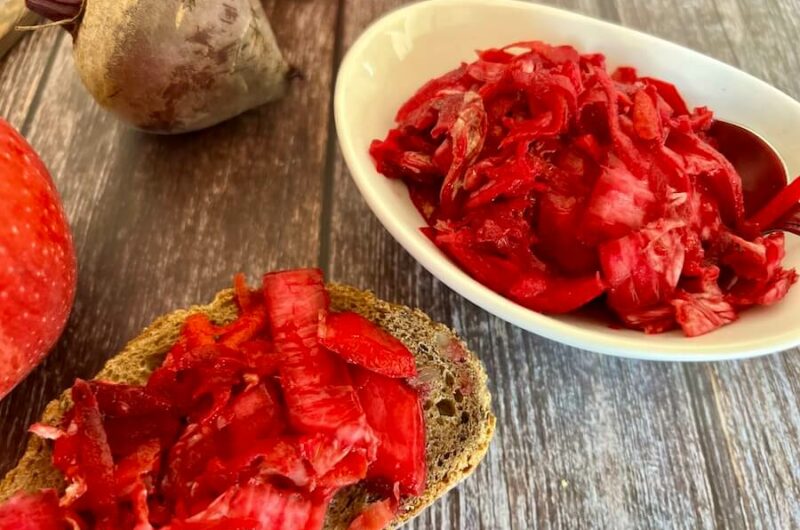
For this recipe I’ve chosen the chopped version, which I find more versatile and easy-to-grab-a-spoonful-of!
Oh, and don’t throw away the liquid if there is any left at the bottom of the jar. Use it to flavour rice or dressings or soups or anything else you’re making.
How to Make a Simple Spicy Kimchi
Ok, so there are tons of recipes out there and everyone has their own way of making kimchi.
This is just the way I make it, the way I’ve found it simplest and easiest to get great results. But the journey is young so I’m sure I’ll discover more adaptations to share with you along the way.
A lot of recipes soak the cabbage in brine first but here we’re going to put the salt directly on the cabbage (& other veggies) and let it sweat for a few hours rather than soak it in brine overnight.
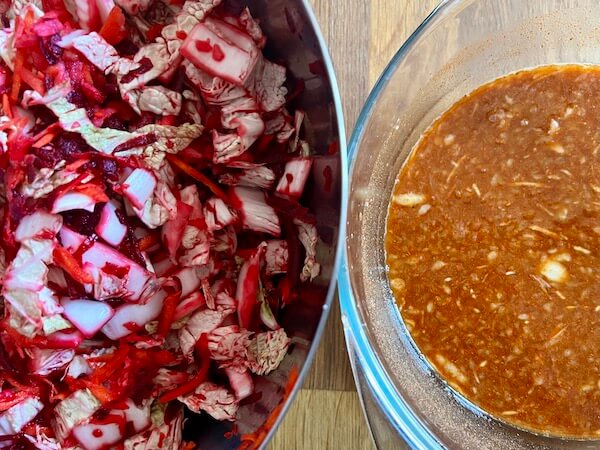
We’re going to make a spicy sauce in one bowl and prepare the cabbage & veggies in another. For the vegetable part in this recipe we’ll use 1 curly cabbage (savoy), 1 raw beetroot, 1 apple, 2-3 carrots and 1-2 cm fresh ginger.
As always, switch around the ingredients according to what you have, or what you prefer.
Slice the cabbage into chunky slices and grate the rest of the veggie ingredients into a bowl. Mix well and sprinkle on 1 tablespoon of salt.
Rub it in well (and see below for details on how much salt to add).
Leave the salted veggies to sit, lightly covered, for a few hours (about 3 is fine) while you prepare the sauce.
In a bowl, add 1 tablespoon of smoked or non-smoked paprika, depending on your preference and 1 tablespoon of spicy paprika (or adjust the amount if using hot chilli).
Add 4 tablespoons of Tamari (gluten free soy sauce) and a dash of apple cider vinegar.
Grate 4 cloves of garlic and 1/2 an onion (or 1 onion if small) into the sauce and add 1 tablespoon of maize flour and 1/2-1 cup of water.
Mix the sauce together and allow to stand, covered.
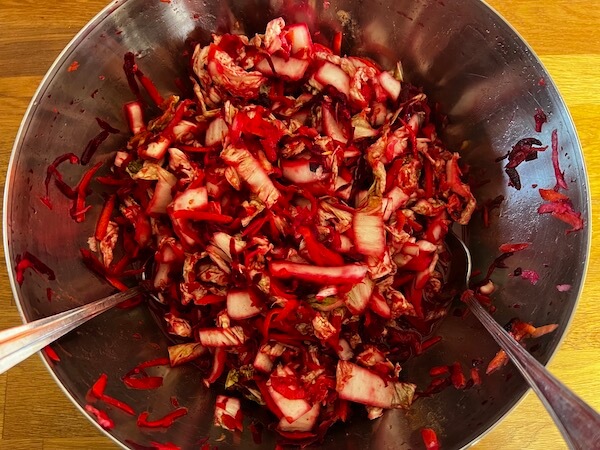
Once the cabbage has sweated in the salt for 3 hours, pour on the sauce and mix well. Taste it to check the flavours – they should be delicious even at this stage.
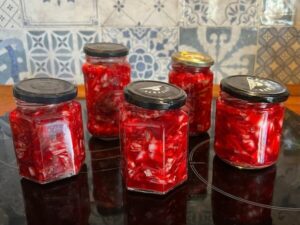
Finally, pack the mixture into your jars, pushing each level down well. Leave the jars covered but not sealed for 3-4 days out of the fridge in a dark place.
After 3-4 days, taste the kimchi and transfer to the fridge with lids on the jars. It will continue to ferment in the fridge, just slower.
Possible vegetable ingredients for KimchiVeggie mix in one bowl, sauce in anotherKimchi mix ready to pack into jars
How to Know How Much Salt to Add
The quantity of salt will vary a bit depending on what type of salt you have and how big your cabbage is.
For example, at the moment I have a very weak Himalayan salt in my kitchen and I added almost 2 tablespoons to the last batch.
But remember that if you add too much salt, you’ll slow down or even stop the fermentation process.
And if you under-salt it, the cabbage will go soft and bad and won’t ferment properly either.
But just be aware of this, rather than worrying about it like I did when I first started making sauerkraut. It isn’t something to be nervous about.
Rub the tablespoon of salt into the cabbage so that every bit of cabbage is covered and leave it for 30 minutes or so. Then taste the cabbage.
It should taste salty but not inedible-salty. Just a little bit more salty than how you would salt your chips for example (if you do salt your chips haha).
Finally, if you prefer to go by measurements, the standard accepted amount of salt is to make a 2.5% brine. You can do this by adding 2.5 g of salt for every 100g of veggies (+liquid).
Or you can weigh the food + liquid and multiply it by 0.025 to get the amount of salt needed.
I don’t doubt that measuring is the more accurate way to do it.
But I prefer to do it by gut, or rather by eye and taste. I’m just that kind of cook. Lazy lol!
Tips for Making Kimchi
Make sure the utensils and containers are clean so that you don’t introduce other bacteria into the process.
Place the jars of kimchi in a cool place to ferment. If you live in a hot climate, you may have to adjust the timing of the fermentation process as it will be much quicker. Ideally, make the kimchi when it isn’t too hot in the house.
Play with the ingredients to suit what you have available. Don’t be scared to switch things around.
Once made, kimchi keeps for several months in the fridge, so make larger batches at a time to enjoy your kimchi all year round.
Remember that too much salt will slow down the fermentation and too little salt won’t be enough to get the fermentation going in the first place.
Add the amount of chilli according to your preference. Every chilli powder is different, so if you think it needs more or less than the recipe, adjust it accordinly.
Cover the kimchi but don’t seal it while it ferments.
Other Kimchi Vegetables You Can Use
There aren’t any limitations on which vegetables you use in your kimchi, though they will effect the profile of the final product.
Traditionally, kimchi’s made using a long whitish Korean radish which is similar to the better-known Chinese/Japanese radish – daikon.
If you don’t have any daikons in your kitchen, you can just omit the radish or use a standard radish. As a European radish has a pungent sharp flavour, they can change the flavour of your kimchi and make it more bitter.
Other suggestions for using in kimchi are cucumber, celery, aubergine, turnips or kohlrabi.
You can even sub the apple for pear.
Once you’ve got the hang of making it, play around with it!
How Long does Kimchi Last?
It’s important to keep kimchi in the fridge because it keeps on fermenting and the cold temperature slows down the fermentation process.
Kept in the fridge, kimchi will last for up to 6 months but it gets softer and more sour as time progresses and the fermentation process continues.
If it tastes soft & sour, you can still eat it, but it might not be as tasty or appealing.
Discard any kimchi that shows signs of mould growing or discolouration occurring. And while kimchi always has a pungent smell, it shouldn’t smell foul, so if in doubt, give it a good sniff to see if it’s smelling off. If so, discard it, naturally.
To help your kimchi have a longer life once opened, try to open the jar as little as possible. So remove enough kimchi for the whole family meal and place it into a bowl, returning the jar to the fridge.
Also, before closing the lid, push the kimchi down to make sure it’s covered in the brine.
Recipe by SorayaCourse: Condiment, SidesCuisine: KoreanDifficulty: Easy
Servings
5
jars
Prep time
40
minutes
Resting time
3
hours
Easy to make, spicy tangy Kimchi
Ingredients for the veggies
1 savoy cabbage thickly sliced
2-3 carrots, grated
1 apple, grated
1 raw beetroot, grated
2 cm fresh ginger, grated
1 tablespoon salt
For the Sauce
1 tablespoon sweet paprika (or smoked)
1 tablespoon hot paprika
4 tablespoons Tamari soy sauce
Dash of apple cider vinegar
4 cloves garlic, grated
1/2 onion, grated
1 tablespoon maize flour
1 cup water
Directions
Mix all the veggie ingredients together and rub in 1 tablespoon salt. Leave to stand for approx 2 hours.
Mix all the sauce ingredients together.
After 3 hours, pour the sauce over the cabbage mix and stir.
Tightly pack some jars with the mixture, pressing it down and making sure that the top is covered in some of the liquid.
Place a lid over the jar without closing it. It should be able to breathe.
Stand in a cool dark place for about 4 days.
Taste it to check, then seal tightly with the lid and transfer to the fridge.
Notes
Kimchi can be eaten immediately or at any point through the process, so keep tasting it to catch it at the point you like best. Normally about 3-4 days is perfect before transferring it to the fridge to slow down fermentation.


")
")